(Video Edit) Tag: Visual edit |
(Video added) Tag: Visual edit |
||
| Line 41: | Line 41: | ||
# The last thing I wanted to point out before we finish off Macros was how to enter the VBA coding environment. As stated previously this macro was created using the "Record Macro" function in excel that automatically generates the required VBA code for you. You might have been wondering "Where can I see the code?". In which case I would direct you to the Developer Tab → Macros → then select the macro you wish to examine and press "Edit". From there a window similar to the below will appear where you can manually inspect and alter the code to perform more complex processes such as initiate for loops, while loops, and if statements, etc.[[File:VBAEnviro.png|centre|thumb|448x448px]]Below you will find the corresponding Video for Button & Macro creation showing the preceding steps.[[File:Macros & VBA|centre|thumb|435x435px]] |
# The last thing I wanted to point out before we finish off Macros was how to enter the VBA coding environment. As stated previously this macro was created using the "Record Macro" function in excel that automatically generates the required VBA code for you. You might have been wondering "Where can I see the code?". In which case I would direct you to the Developer Tab → Macros → then select the macro you wish to examine and press "Edit". From there a window similar to the below will appear where you can manually inspect and alter the code to perform more complex processes such as initiate for loops, while loops, and if statements, etc.[[File:VBAEnviro.png|centre|thumb|448x448px]]Below you will find the corresponding Video for Button & Macro creation showing the preceding steps.[[File:Macros & VBA|centre|thumb|435x435px]] |
||
Congratulations! You've just created a working button and macro. Using this you can expedite any iteration process significantly however, in the case of batch distillation several hundred iteration processes are used to generate accurate equilibrium curves. For similar bulk calculations in any other lab the you can look to the VBA guide that should be posted in the near future. Until then, good luck on your labs! |
Congratulations! You've just created a working button and macro. Using this you can expedite any iteration process significantly however, in the case of batch distillation several hundred iteration processes are used to generate accurate equilibrium curves. For similar bulk calculations in any other lab the you can look to the VBA guide that should be posted in the near future. Until then, good luck on your labs! |
||
| + | |||
| + | This Last Video linked below will go over the last bits of code needed to fully automate processes using VBA code in excel's coding environment. A written guide covering its topics will be uploaded in the near future. |
||
| + | [[File:Ceng 176- Simple Commands and Loops in VBA|centre|thumb|425x425px]] |
||
== Some other topic not about "Automating Analyses" == |
== Some other topic not about "Automating Analyses" == |
||
Revision as of 01:24, 5 February 2018
Automating Analyses in Microsoft Excel
Motivation
This is being written to introduce basic Excel macros and simple VBA code to CENG 176 students, particularly those doing the Batch Distillation lab. Although the examples used in this demonstration will be related to Batch Distillation I highly encourage other lab groups to use the techniques outlined here to simplify any excel calculations used in their respective labs.
If most CENG students were like myself in my senior year, you may be unfamiliar with how powerful Excel can be through the use of VBA (Visual Basic for Application) which is the name of Excel's coding language. When I was first introduced to this I remember exclaiming to myself "Excel has a coding language!?!?" and being pleasantly surprised at how useful it could be particularly in large iterative calculations as well as for managing large data sets rather intuitively.
As a disclaimer, because we are all engineers it should be said that everything that I am about to show you can just as well be done in MATLAB and I encourage students to attempt the same exercises using MATLAB to gain familiarity, but I personally found this done more intuitively quickly in Excel.
Basic Setup
Only one thing is required to begin using macros in Excel which is to enable the developer tab in the top ribbon if not already enabled. This can be done from any open spreadsheet and will be shown using Excel 2013:
- Start by checking to see if the developer tab is enabled on your top Ribbon. If you see the Developer tab in your ribbon it is enabled like in the picture below. If this is the case then you are good to go!
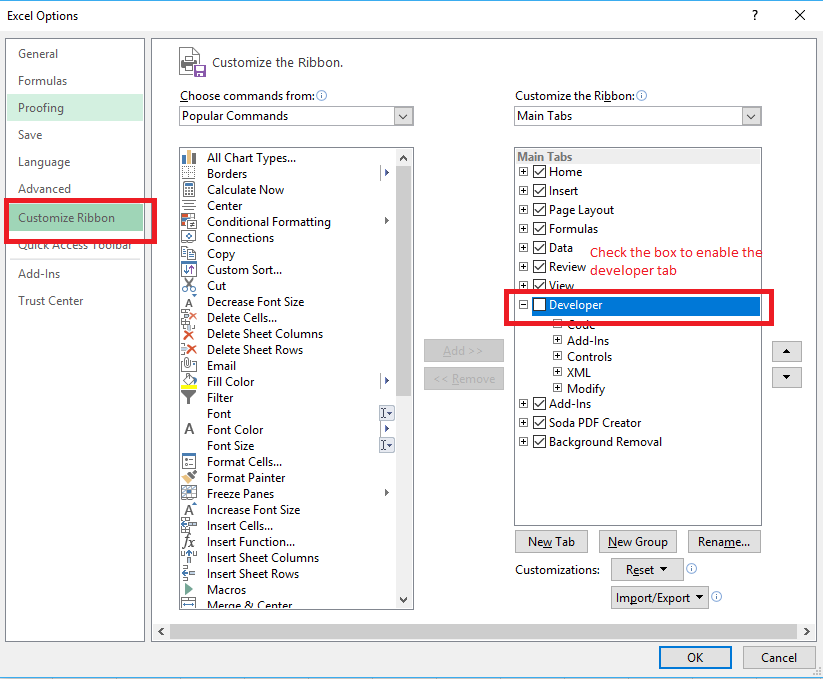
- If the developer tab is not enabled on your system go to File → Options and on the left side tabs click "Customize Ribbon" to see a window similar to the below image. From there ensure that the Developer option is check marked on the right side. If you don't see Developer on the right window you may have to move it from the left to the right using the "Add" button between the two sides.

Goal Seek: A Simple Iterative Function
With the basic setup out of the way we can now get to the fun and exciting world of macros & VBA in Excel. In order to demonstrate this I'm going to use a set of macros to plot and graph a VLE ethanol-water mixture. Before I do that however, in case some students were not aware of an integral function in Excel known as "Goal-Seek" it will be introduced prior to discussion on macros. For clarity purposes you can also find a video demonstrating each section of this excel tutorial at the end of their respective sections.
First, start by setting up whatever particular iterative calculation you will be doing. The following steps will use an iterative flash calculation as an example.
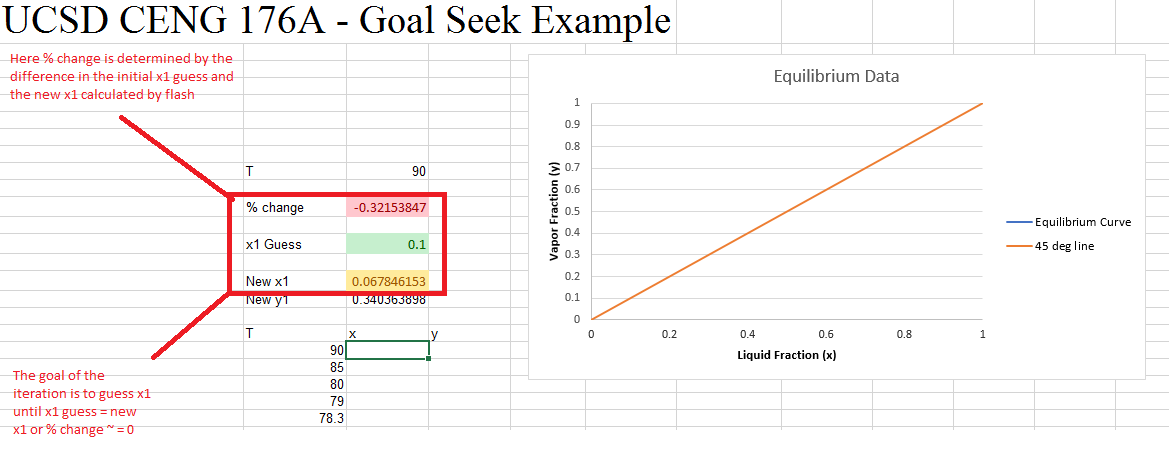
- First start by determining within your iteration what variable you want to set to a particular value based on the changing of another variable. For iterations, this typically boils down to setting a "Percent change" variable to "0" based on changes in an "initial guess". In the example below for the flash calculation new guesses of x1 are made at a set temperature and from that initial x1 guess a new value of x1 is calculated and the two are compared by the "% change" shown in red.
- Once you're confident of what variable will be what in your iteration, go to the Data Tab → "What-If Analysis" → Goal-Seek.
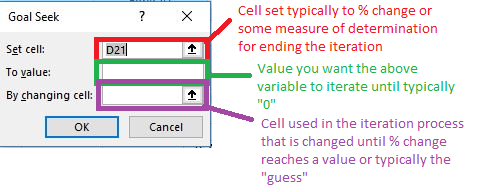
- From there a simple window will appear with 3 variables that need to be set for Goal-Seek to iterate through.
- The first cell is determined to be "% change" in this example but generally speaking the 1st variable is some measurement of difference calculated to determine when you would stop iterating after it reaches a particular value.
- That particular value is defined in the second variable for the user to fill which in this case is the number"0" because we want to iterate until. the "% change" reaches approximately 0 in this iteration.
- After that the last variable to fill is the variable used to determine what causes changes in your 1st variable. In this case we are setting it to be the "x1 guess" that is used as the iteration variable.


With your parameters set just press ok and you spreadsheet will magically update with the iterated solution. If you get an error you may have to double check your parameters or iteration process because errors would typically indicate that for whatever reason excel could not find a solution to the iteration.
Below you will find the Goal-Seek video tutorial that cover the preceding steps.

Macro and Button Creation
If you have not already double check that the developer tab is accessible through the top ribbon. If it is not go back to the "Basic Setup" section of this guide to ensure that it is. There are two ways to create macros in excel, using VBA code is a slightly more complex way compared to using a Record macro excel function. Both will be explained below starting with the simplest case.
- Explanation: The Record Macro button is a function in excel that when pressed will automatically generate VBA code based on mouse clicks and input after beginning the recording process. In the preceding steps we will create a macro that will do the same goal seek iteration we did previously at the click of a button.
- To access this function simply go to the Developer tab and press the record macro button and input a unique name for your macro to begin recording. NOTE*: once the record macro button is pressed be wary of entering any input or mouse clicks that are unwanted for the Macro itself. Nearly everything you do is recorded into the macro once it has started.
- Once you start recording go to the Data tab and precede with the same Goal Seek we did in the previous section, that is Data Tab → "What-If Analysis" → Goal-Seek. After completing the Goal-Seek analysis return to the Developer tab and hit stop recording.
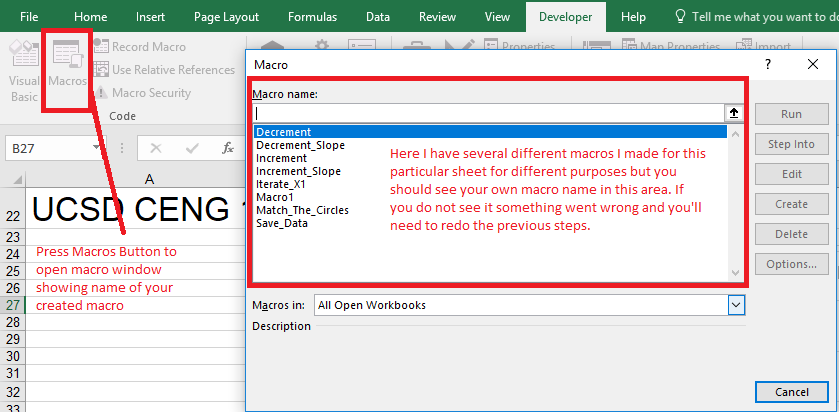
- You can verify that your macro had been created succesfully by going to the Developer Tab and pressing "Macro" where you should be able to see a menu with lists of created macros that should include the one you just created.
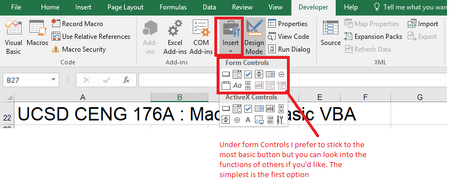
- The next step is that now you have a macro you'll need to verify it works by attaching the code to a button you can use to initiate the iteration. This is done simply within the developer tab → insert → Button (Form Control). After pressing it click and drag to form a button.
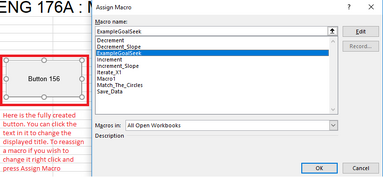
- You will then be asked to assign a macro to the button at which point you can select a macro your list, for this example and in the accompanying video I used a Goal Seek macro assigned to the button.
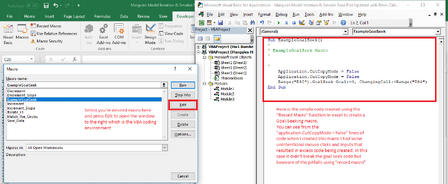
- The last thing I wanted to point out before we finish off Macros was how to enter the VBA coding environment. As stated previously this macro was created using the "Record Macro" function in excel that automatically generates the required VBA code for you. You might have been wondering "Where can I see the code?". In which case I would direct you to the Developer Tab → Macros → then select the macro you wish to examine and press "Edit". From there a window similar to the below will appear where you can manually inspect and alter the code to perform more complex processes such as initiate for loops, while loops, and if statements, etc.Below you will find the corresponding Video for Button & Macro creation showing the preceding steps.


Congratulations! You've just created a working button and macro. Using this you can expedite any iteration process significantly however, in the case of batch distillation several hundred iteration processes are used to generate accurate equilibrium curves. For similar bulk calculations in any other lab the you can look to the VBA guide that should be posted in the near future. Until then, good luck on your labs!
This Last Video linked below will go over the last bits of code needed to fully automate processes using VBA code in excel's coding environment. A written guide covering its topics will be uploaded in the near future.
